This is one of the first good stuff i did in ARToolkit. I downloaded the models from internet. That was a long time ago, then i can't remember the site, but I'll search and post here.

Tuesday, August 2, 2011
Sunday, July 31, 2011
Wednesday, July 20, 2011
Starting with Flartoolkit (Augmented Reality for Flash)
In this post i'll show the Flartoolkit, the flash version of ARToolkit.
Actually, FLARToolKit is based on NyARToolkit, Java ported version of ARToolKit.

FLARToolKit recognize the marker from input image. and calculate its orientation and position in 3D world, but you should draw 3D graphics by your own.
The flash 3D engines (Papervision3D, Away3D, Sandy, Alternativa3D) are included for help with this task.
Papervision3D is used in starter-kit.
All you need is have an instalation of Adobe Flash CS4 or CS5. You can get it for free in Adobe site.
When you have the Flash CS, the unique thing that you must do is download the Flar Starter Kit on http://saqoo.sh/a/en/flartoolkit/start-up-guide (in Japanese)
Direct link
http://saqoosha.net/lab/FLARToolKit/FLARToolKit-starter-kit.zip
After this unzip the file, open the Earth.fla or SimpleCube.fla. You can change the source code and recompile it.
Done, you have the Flartoolkit working =)
Android first App
In the last post i show how to configure the environment to program for Android.
First of all open the Eclipse and click in File>New>Andorid Project

Choose a project name, the build target and fill the properties like this


First of all open the Eclipse and click in File>New>Andorid Project

Choose a project name, the build target and fill the properties like this

Click in Finish
Don't be alarmed if you see some error in the project. It's normal. Will fix in some seconds.
Click on  and this window will open
and this window will open
Click in new and fill the fields like this.
Choose the same target you did before. The min SD Card is 9mb. You must define this for install your app.

Click in Create AVD.
After ckick in the create avd and start...
I recommend you to check Scale display to real size.
For my 15'' monitor i use 6
Wipe user data clear the AVD. Dont check everytime

Click in Launch.
The emulator boot take some time.
Another coffee!

I realy love coffee :)

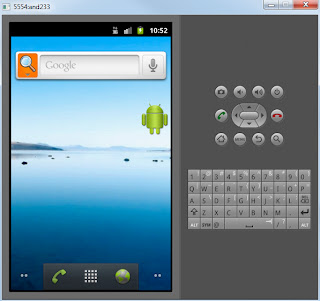
Now just click in play button and select Android Application

Done! Your app is running

The good news is that you don't need to restart the emulartor every time. You just need to run the project again.
In teh next post i'll explain the code of the Hello World App.
Enjoy
Intalling Android SDK on Eclipse - Windows and Ubuntu
Today i'll show how intall the Android SDK on Eclipse for Windows 7 and Ubuntu.
The first thing is to download the Eclipse for your operational system.
Go to http://www.eclipse.org/downloads/ and choose the right link.
Windows:
Ubuntu:
Unzip the Eclipse file and put in some place you like.
After this download the Android SDK at http://developer.android.com/sdk/index.html
For windows download the zip file, not the windows installer (i'll explain below)
For Ubuntu download the tar.gz.
Now came an important step
Unzip the SDK to a folder without any blank spaces. Windows intaller will put in "C:\program files\Android".
The ADT (Android Development Plugin) for eclipse have a bug. It can't start the emulator if the SDK is in a folder with spaces.
Done so, open the eclipse and go in Help>Install new software.Click in Add, and put a name as Android or anything. In Location put https://dl-ssl.google.com/android/eclipse/
Check teh box in Development Tools, Next and Finish.
Now you just have to install the packages for what versions of Android you want develop.
I downloaded all.
Click in this icon  and go in Avaliable packages. Check any boxes and click in install selected.
and go in Avaliable packages. Check any boxes and click in install selected.Check accept all and install.
Go take some coffees

Afer a lot of instalation hours you are ready to program for Android :)
I next post i'll show how to set the first android project an test it on emulator and phone.
Tuesday, July 19, 2011
Installing ARToolkit in Windows using Microsoft Visual Studio 2008 as IDE
Now i'll show how install ARToolkit on windows 7, using MIcrosoft Visual Studio 2008 as IDE.
First of all we need to install MIcrosoft Visual Studio 2008 (MIcrosoft Visual Studio 2010 works to)


On windows we can use pre-built ARToolkit. This make more easy to get this working.
In this site (in Japanese) you can download the pre-built lib (with OpenVRML).
This is the direct link.
Unzip the ARToolKit-2.7.1-bin-book.zip to your C drive for example.
It’s a simple intalation:

Click on Install Visual Studio 2008

After click in Next

Next again

Once more

Time for a coffee

Time for a coffee

"Enjoy" some pictures of Microsoft programmers.

One more (lol)

Click in finish
Let's install ARToolkit
On windows we can use pre-built ARToolkit. This make more easy to get this working.
In this site (in Japanese) you can download the pre-built lib (with OpenVRML).
This is the direct link.
Unzip the ARToolKit-2.7.1-bin-book.zip to your C drive for example.
You’ll need to download these files.
1.http://sourceforge.net/project/downloading.php?group_id=116280&filename=DSVL-0.0.8b.zip&a=98368761
2.http://www.dll-files.com/dllindex/dll-files.shtml?msvcp71d
3.http://www.dll-files.com/dllindex/dll-files.shtml?msvcr71d
Unzip the file DSVL-0.0.8b.zip into ARToolKit folder. Like, C:\ARToolKit\DSVL;
Copy the files DSVL.dll and DSVLd.dll that are in C:\ARToolKit\DSVL\bin for C:\ARToolKit\bin;
After this you’ll need install OpenGL and Glut in Visual Studio 2008
For this download :
http://sites.google.com/a/maxwellanderson.com.br/www/espa%C3%A7o-acad%C3%AAmico/arquivos/BibliotecasOpenGL.rar?attredirects=0
Unzip the file to a temporary local. Copy the files opengl32.dll, glut32.dll e glu32.dll to C:\Windows\System32 if you’re in Windows 86x (32bits) or C:\Windows\SysWow64 if Windows 64x
Copy the folder include to C:\Program Files\Microsoft Visual Studio 9.0\VC\include and folder lib to C:\Program Files\Microsoft Visual Studio 9.0\VC\lib
Now go to C:\ARToolKit and open the file ARToolKit.sln.
A conversion window will appear. Agree to all.
Click on the “Play” button. Must compile without errors

Change the Debug to Release and click again

Now you must be able to compile the examples. Let’s try it. First off all you need to copy these files to C:\windows\system32

Go to C:\ARToolKit\examples\simpleLite and open simpleLite.vcproj and try to compile it.
Everything's runs well, BUT you won’t gonna run it.
You need to copy C:\ARToolKit\bin\Data to C:\ARToolKit\examples\SimpleLite.
Right click on SimpleLite project and go to Properties.
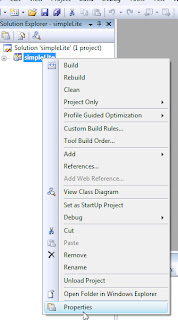
Go to Linker>General and change Output File to $(OutDir)\$(ProjectName).exe. It’s necessary to compile the program to the current folder, and not to the folder C:\ARToolKit\bin

After that you must be able to compile and run the project.
You need to repeat this last step for all example projects you want compile.
Unzip the file to a temporary local. Copy the files opengl32.dll, glut32.dll e glu32.dll to C:\Windows\System32 if you’re in Windows 86x (32bits) or C:\Windows\SysWow64 if Windows 64x
Copy the folder include to C:\Program Files\Microsoft Visual Studio 9.0\VC\include and folder lib to C:\Program Files\Microsoft Visual Studio 9.0\VC\lib
Now go to C:\ARToolKit and open the file ARToolKit.sln.
A conversion window will appear. Agree to all.
Click on the “Play” button. Must compile without errors
Change the Debug to Release and click again
Now you must be able to compile the examples. Let’s try it. First off all you need to copy these files to C:\windows\system32
Go to C:\ARToolKit\examples\simpleLite and open simpleLite.vcproj and try to compile it.
Everything's runs well, BUT you won’t gonna run it.
You need to copy C:\ARToolKit\bin\Data to C:\ARToolKit\examples\SimpleLite.
Right click on SimpleLite project and go to Properties.

Go to Linker>General and change Output File to $(OutDir)\$(ProjectName).exe. It’s necessary to compile the program to the current folder, and not to the folder C:\ARToolKit\bin

After that you must be able to compile and run the project.
You need to repeat this last step for all example projects you want compile.
Starting a new environment
I was formatting my notebook since yesterday...
I've a lot of data to backup and inumerous softwares to install. I think i'll end tonight.

Then i'll start to post more often. The plan is to teach how install and configure the ARToolkit lib on Windows 7 and Ubuntu.
I'm learning about Android development and augmented reality for that.
I hope that many people as possible enjoy the blog
Subscribe to:
Posts (Atom)